Embarking on the journey of becoming a tattoo artist requires a solid foundation in fundamental techniques. As demonstrated in the accompanying video, mastering the basics of line work and shading is absolutely essential for anyone aspiring to create professional and lasting body art. This guide will expand upon these critical concepts, providing new tattoo artists with deeper insights into achieving precision and artistry from the very beginning.
Establishing Solid Line Work Foundations for New Tattoo Artists
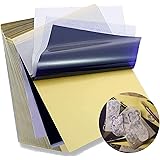
Precision in line work is the cornerstone of any tattoo. It defines the structure, clarity, and overall aesthetic of the design. The video rightly emphasizes the technique of starting from the bottom corner and working upwards, a crucial strategy that prevents inadvertently smudging or wiping off the delicate stencil, thereby maintaining the integrity of your guide throughout the tattooing process.
Optimal Stencil Preservation and Skin Preparation
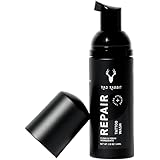
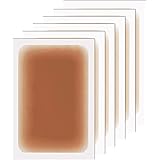
Maintaining a clear and visible stencil is paramount for successful line work. Beyond working upwards, the application of a thin layer of tattoo lubricant is a critical step. While Vaseline is effective for practice on fake skins, professional artists often utilize specialized tattoo balms or glide products designed to create a protective barrier. This lubricant not only facilitates the smooth glide of the needle across the skin but also acts as a barrier, preventing excess ink from drying onto the surface and obscuring your stencil.
Furthermore, the video highlights the distinction between dabbing and wiping. For line work, dabbing with a clean paper towel is the recommended approach. This gentle action efficiently removes excess ink and blood without applying lateral force that could smudge the stencil. Conversely, wiping, particularly with a solution like green soap, is more appropriate for larger areas during shading, where stencil integrity is less of an immediate concern.
Machine Settings and Technique for Crisp Lines
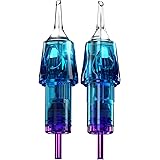
The choice of needle and voltage significantly impacts the quality of your line work. As mentioned in the video, a 9 Round Liner (RL) is a common and versatile choice for outlining. Round liners are configured with tightly packed needles in a circular pattern, ideal for creating crisp, solid lines. The 8-volt setting suggested is a good starting point, providing sufficient power to penetrate the skin consistently and deposit ink effectively without causing excessive trauma.
However, voltage can vary based on machine type, needle configuration, and even the artist’s hand speed and skin type. It is imperative to develop a steady hand and consistent machine speed. Undersaturated lines result from moving too quickly or insufficient needle depth, while blowouts can occur from pressing too hard or having the voltage too high for the needle grouping. Consistent depth and steady hand movement are achieved through diligent practice, ensuring that ink is deposited evenly along the entire line.
Mastering Shading Techniques and Pigment Application
After achieving flawless line work, the next critical step is to bring depth and dimension to the tattoo through effective shading. Shading transforms a flat outline into a dynamic piece of art, adding realism and visual interest. The video introduces key concepts such as whip shading and cross-hatching, both invaluable techniques for new tattoo artists.
Utilizing Specialized Needles and Voltage for Smooth Blends
For shading, the video suggests using a 13 Curved Magnum (CM) at 6.5 volts. Curved magnums, or “soft edge” magnums, have needles arranged in an arc, which allows for softer edges and smoother transitions in shading. This design minimizes harsh lines and skin trauma compared to traditional flat or straight magnums. The lower voltage of 6.5 volts is typically used for shading because it allows for more controlled ink saturation and reduces the risk of overworking the skin while building up layers of color.
Different shading effects require varying needle groupings and voltages. For instance, soft black and gray work might use lower voltages and lighter hand pressure, while packing solid color often requires higher voltages and a more deliberate approach to ensure even pigment saturation. Experimentation on fake skin with various needle types—such as flat magnums for dense packing or softer round shaders for delicate blends—is highly recommended to understand their unique characteristics.
Advanced Shading Methods: Whip Shading and Cross-Hatching
Whip shading, as described, involves gradually tilting the machine upwards as you pull away from yourself and exit the skin. This technique creates a gradient effect, transitioning from a darker, more saturated area to a lighter, softer edge. It is particularly effective for creating subtle fades, adding texture, or building up layers of color gradually.
Conversely, cross-hatching involves applying shading strokes in multiple directions, often overlapping at different angles. This method builds up pigment in a very controlled manner, resulting in incredibly smooth and consistent blends, especially in larger areas. By layering strokes, tattoo artists can achieve seamless transitions between different shades and minimize streaky appearances. Adjusting hand speed is crucial; slower speeds tend to pack more pigment, while faster speeds create lighter, more diffused effects. Understanding these nuances empowers new tattoo artists to control their artistic output effectively.
Ink & Answers: Q&A for Budding Tattoo Artists
What is the most important skill for new tattoo artists to learn first?
Mastering the basics of line work and shading is absolutely essential for anyone aspiring to create professional and lasting body art.
How can I prevent the tattoo stencil from smudging while I’m doing linework?
To preserve your stencil, you should work from the bottom corner upwards, apply a thin layer of tattoo lubricant, and gently dab away excess ink rather than wiping.
What kind of needle and voltage settings are good starting points for tattoo linework?
A 9 Round Liner (RL) is a common choice for outlining, and an 8-volt setting is a good starting point to consistently penetrate the skin.
What is whip shading?
Whip shading is a technique where you gradually tilt the tattoo machine upwards as you pull away from the skin, creating a gradient effect from dark to light.
What type of needle and voltage should I use for shading?
For shading, a 13 Curved Magnum (CM) at 6.5 volts is typically suggested to create smoother blends and reduce the risk of overworking the skin.